Latest Updates

How To Getting Started on YouTube

How To Getting Started on YouTube
ChannelFor some small businesses and organizations, building a library of video content onYouTube sounds like a daunting task.
But you shouldn’t let your initial nervousness get in the way of giving this powerful channel a try.
The most important thing you’ll need for a successful YouTube channel is probably something you already have — an understanding of who your audience is and what kinds of things they find valuable.
Video content can help your branding efforts and show off your business expertise; but it’s also a great way to entertain, educate, and connect with people.
To unlock some of the amazing opportunities YouTube can offer your business, let’s take a look at some of the things you will need to do when first getting started:

1. Think about what you want to achieve

Before you do anything, you need to figure out what you’re hoping to get out of building a presence on YouTube.
This will help you decide what type of videos you want to create and define the right audience for your content.
Having a goal in mind from the start means you’ll be creating content that your audience will want to subscribe to, bookmark, and share with a friend or colleague. If you focus on content that is useful to your audience, your viewers will see you as a trusted resource of information.

2. Create your channel

You will need a Google account to start your YouTube channel. Once you have created your account and navigated to YouTube, you will be asked to name your channel. Using the name of your business is probably the best option. You want to make it easy for you audience to find you!
Once you answer a couple questions and agree to the terms, you will be brought to your new channel.
It’s important to do a little housekeeping before you start promoting your new page — you want to make sure you make a good first impression on your visitors!
Here are a few quick things you should focus on, right from the beginning:
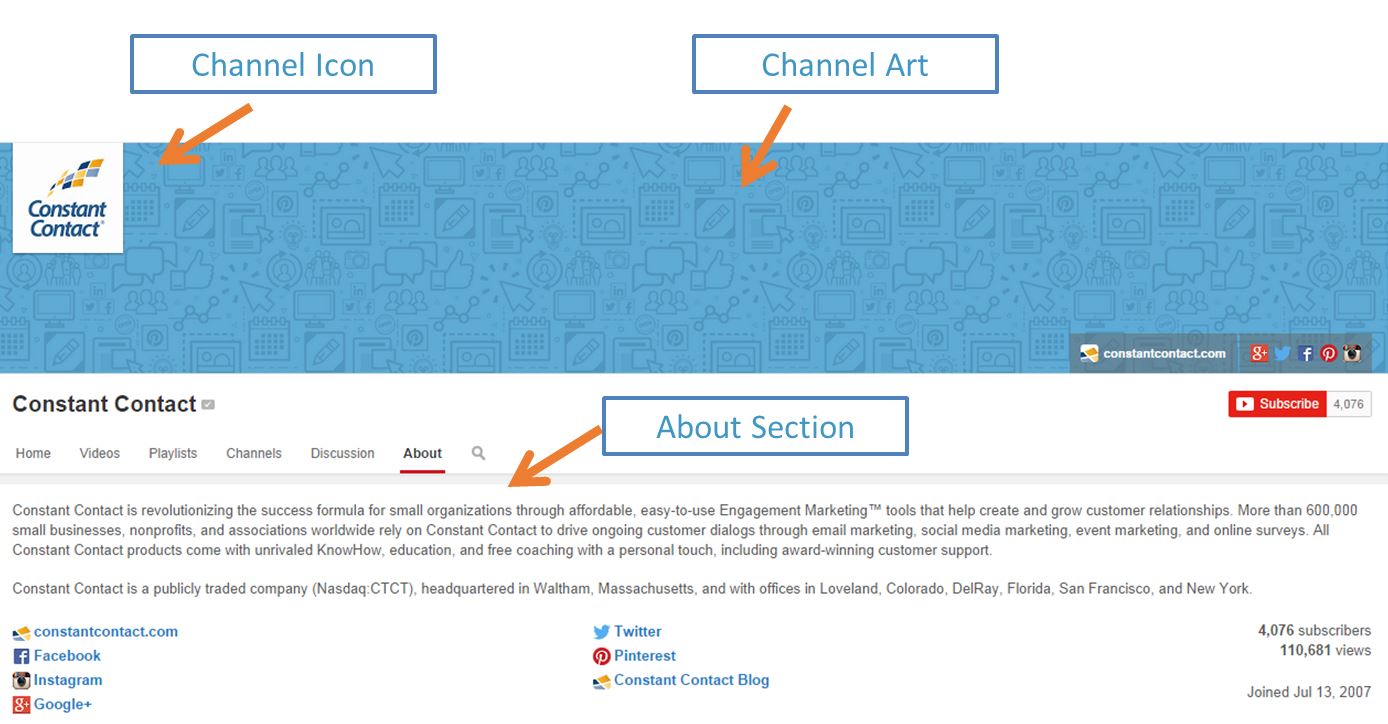
Channel
Channel Icon
Upload your company logo to the channel icon box at the top left of your channel page. If you don’t have a logo, use a quality image that represents your business in a professional manner. Here are some tips for making your image the right size for YouTube.
About Section 
The about section is an opportunity for you to tell people who you are, what you do, where to find you, and how to get in touch. Be sure to link to all your other social networks so that people can follow you on multiple channels. You should also link to your company website here.
Channel Art
You can help your channel stand out from the crowd by customizing your channel art.YouTube provides a great walkthrough of this process, complete with dimensions and how your artwork will be displayed across a variety of devices including mobile phones and televisions.
Be careful when choosing your channel art. I suggest using a simple design or pattern that is consistent with your company’s branding. Also, make sure you have the rights to use image you choose.  Lastly, go check out what these images look like on other devices to make sure everything looks good. Phones, televisions, tablets, and desktops all show the channel art at different dimensions.

Channel3. Make some videos

This is the fun part! Gather up all the equipment you have and go shoot some video footage. Even if you’re only working with your smartphone, you can still make a really great video as long as it’s useful.
Remember to be confident and have fun. Great videos always have good energy; if you’re not having fun making the video, your audience probably won’t have fun watching it.
Here are a few helpful resources to help you get started:

4. Create playlists

Once you’ve created a few videos, group them together into playlists on your channel.
Even if you only have a few videos, it’s a good idea to put them together on a playlist. I like to do this because the title you choose for your playlist can help you get ranked higher in Google search results.
Playlists will also encourage people to watch more of your videos because they’ll see a list of the rest of your videos in the series, which makes your content more episodic. Auto-plays do a good job of engaging viewers to watch multiple videos, with no effort on their part.
One of my favorite YouTube channel features is that you are given the option of having playlists featured on your YouTube channel page. Not only do you get to organize and categorize your content, but you can also highlight the videos you want to draw the most attention to and get creative with the presentation.

5. Share your content

While your videos may get some traffic through search alone, don’t hesitate to promote your videos through your other online channels.
The people who have already connected with you on Facebook, Twitter, Google+, LinkedIn, Instagram, and Pinterest are likely to appreciate your new videos as well.
And don’t forget about email! Including a video in your next email is a great way to engage your subscribers and drive traffic to your YouTube page.

6. Analyze your data

Once you’ve started putting your videos out there, go and take a peek at how people are engaging with them.
Ideally, you want people watching your video all the way to the end. YouTube Analyticscan show you if people are turning off your video at a certain point through the Audience Retention report. This is a good way to gauge if the length of your videos is right. Shorter and more engaging videos are often the most effective.
For more information on all the YouTube Analytics categories and features you can use, check out my post on understanding YouTube Analytics.

7. Stay engaged with your audience

Don’t just upload your video and forget about it. Check in to see if people are commenting. Responding to people’s questions or comments can create conversations that help your audience learn more about your company and the topic of your video.
Not only can they learn from you, but you can learn from them about what you could be doing better to cater to your audience’s needs. Every comment you receive on a video is an opportunity to create a deeper conversation and connection.

8. Link to your Google+ Account

Be sure to link your Google+ account to your YouTube channel. This ensures that any comments your video receives on Google+ post will appear on the video’s dedicated YouTube page.
That way all the feedback your video has generated is centralized in one location. Google provides detailed instructions on how to link the two accounts here.

9. and 10. Use Annotations and verify your website

Annotations are clickable text overlays that you can put into any of your videos. You can choose to link these annotations to another one of your videos or your channel page. Annotations are great for promoting your other video content.
If you’d prefer to create an annotation that links to your website, you will need to verify your site by inserting a line of code into the homepage of your company website. This code is generated in your Google Webmaster Tools link.
I highly recommend leveraging this feature to your benefit. Through managing theConstant Contact YouTube Page, I’ve found that people are often interested in learning more if you make it easy for them.
If you have a blog full of great, relevant content, consider creating an annotation to direct them to your blog.

How to find water when you’re stuck in the desert

If you ever find yourself lost in the desert, knowing how to quickly find water is going to be key to for your survival. Here’s what you’re going to need to know. 
The following is a transcript of the video: 
The human body can survive for about 3 days without water, which can be extremely hard to find in hot desert climates.
Look for signs of life if you can’t find a water source. Vegetation, birds, and insects can all mean a nearby water source. Fruits, vegetables, cacti, and roots all contain water and mashing them with a rock will release some liquid.
Water flows down, so check low terrain. Canyons and mountain bases could be home to a water source.
Morning dew can be collected with a cloth and then wrung out into your mouth.Just make sure you collect it before sunrise or it will evaporate before you can get it. Use cups or any other container to catch rainfall. If possible, build a water-catching tarp. This will allow even more water to be collected.
Look for damp ground, vegetation, and dry river beds. These things can all indicate underground water. If you dig a hole a few feet deep nearby, it’s likely water will seep in. If possible, always filter the water. But if you have to choose between dehydration and unfiltered water — take your chances with the water

How To Download Mp3 From Youtube

How To Download Mp3 From Youtube
YouTube is home to thousands of videos (such as vlogs and music videos) that would make perfect audio files for offline listening. You could use a standard downloader to save the videos and then use a separate tool to extract the audio, but why go to such lengths when a free YouTube to MP3 converter can perform both tasks with a single click?
There are lots of websites that can strip the audio from YouTube videos and send you the audio file to download, but here we've chosen to focus mainly on desktop software. These programs have several advantages: they're faster than browser-based tools, they don't require you to submit your email address (and therefore leave yourself open to spam), and they often allows you to rip the audio from multiple videos at once.
Here, we've rounded up the very best tools for extracting audio from YouTube videos and downloading it as an MP3 - or any other audio format you prefer.
Are YouTube to MP3 converters legal?
You should only download content when you have the copyright owner's permission. YouTube's terms of service explicitly prohibit unauthorized downloading.
Divider
Download YouTube Song Downloader the best free YouTube to MP3 converter

1. Any Video Converter Free

The best YouTube to MP3 converter – just paste an URL to convert and save
You would be forgiven for judging Any Video Converter Free by its name and believing it to be a tool for converting from one video format to another. While this is part of what it can do, it can also be used to download videos from YouTube and save them as MP3s – exactly what we’re looking for! As downloading as MP3s is not the sole purpose of the program, it is rather larger than you might expect, but this should not put you off (but take care not to install the optional adware during setup).
It seems almost overkill to use what is a powerful and versatile piece of software for just one task, but downloading MP3s is as simple as pasting in the URL of a YouTube video and waiting for the download to complete. You can then select MP3 as the output format, and hit the Convert Now button. It's a shame there's no one-click option, but it's hardly a major hardship.

Review and where to download: Any Video Converter Free
Divider
Free YouTube to MP3 Converter

2. Free YouTube to MP3 Converter

Download and convert music from YouTube, complete with album artwork
Free YouTube to MP3 Converter does exactly what you'd expect, and it's perfectly safe to judge it by its name. Unfortunately, like Any Video Converter Free, there is bundled adware from ByteFence to avoid, so be watchful during the installation and uncheck any additional bits and pieces you don't want.
Once installed, however, you're in for a treat. There's no need to fiddle about with options, you can just get on with downloading the music you're interested in immediately. Use a simple drop-down menu to choose the quality and format you would like to save your audio file, paste the URL, and click Download. Files are saved and converted in one fell swoop.
The beauty of Free YouTube to MP3 Converter is that there's no messing about, nothing superfluous, and nothing confusing. It has one purpose in mind, and it has been designed to do it as efficiently as possible. Definitely worth a try – we're sure you'll love it!
Review and where to download: Free YouTube to MP3 Converter
Divider

3. VideoGrabby

Want audio from just one video? Head to VideoGrabby and get it in seconds
If you don’t fancy the idea of installing software – you may only want to download a single MP3, after all – VideoGrabby could be just what you need.
Rather than a downloadable program, VideoGrabby is a web app that can be used to extract the audio from a YouTube video and save it as an MP3 file, quickly and easily. With the URL of a YouTube video safely stashed in your clipboard, pay a visit to the VideoGrabby site and paste the link in to the empty box. Once the link has been analysed, click the Record Audio button and you'll be prompted to save the file to your hard drive. That's all there is to it. 
Should you decide that you would like to download a video in its entirety rather than just the audio, you can do this by following the same procedure but clicking the Record Video button instead. A very handy site to have bookmarked.
Try it online: VideoGrabby
Divider
4K YouTube to MP3

4. Freemake Video Converter


Another piece of software whose name could mislead you, Freemake Video Converter is worth adding to your list of titles for consideration. Aside from a potential privacy concern in the form of usage logging, and the bundling of (thankfully avoidable) extra software, this is a highly competent tool that deserves your attention.
Freemake Video Converter can save audio from YouTube in any format
The interface may seem a little overwhelming, and the program might seem a little too powerful to start with, but it's really just a matter of getting to know how it works. Paste in the URL of a YouTube video, wait for analysis to complete, and then click 'to MP3' to the lower right of the program window – or you can click the Convert menu and opt to convert to Apple's AAC format instead.
Not all of the download and conversion options in this program are free, but most are, and third-party converters can be used to plug the gaps.
Download here: Freemake Video Converter
Divider
Lacey

5. ClipGrab


An utter delight of a program,
ClipGrab keeps things nice and simple – aside from the bundling of the pesky ByteFence adware, which you can opt to skip if you're on the ball.Just copy a YouTube video URL and ClipGrab will handle the rest
The wonderfully simple interface gives you a pleasing hint of just how easy things are going to be, right from the word go. Copy a YouTube URL to the clipboard and ClipGrab will spring into action, offering to download the related video for you.
Even if this doesn’t happen – you might not yet have the program running, for instance – a quick paste into the relevant field is all it takes. You can then indicate that you are interested in downloading the audio as an MP3 before you click the "Grab this clip!" button to do just that. The MP3 you seek will be yours in next to no time.
Review and where to download:ClipGrab

Source

How To Solve the Rubick's Cube

How To Solve the Rubick's Cube
‘How do I solve the Rubik’s Cube?
It took Erno Rubik (the inventor of the Rubik’s Cube) one month to learn how to do a Rubik’s Cube. Some people started thinking about how to complete the Rubik’s Cube back in the 80’s, and in 40 years have got little further than one side. If you want to learn how to solve the Rubik’s Cube, look no further, you have come to the right place!
Getting help with solving the Rubik’s Cube is not cheating. There are 42 Quintillion possibilities, but only one correct solution. Hence without knowing how to solve a Rubik’s Cube it is nearly impossible.
This six step guide will take you through everything you need to know when it comes to solving the Rubik’s Cube. It is really simple, you just have to follow the steps and you will be solving the Rubik’s Cube in less than two minutes (yes, that quickly!).
This guide on how to do the Rubik’s Cube will take about 45 minutes to learn, but once you have you can impress all your friends with how you can solve one of life’s great mysteries: how to do a Rubik’s Cube.

STAGE 1 - GET TO KNOW YOUR RUBIK’S CUBE

Stage 1


stage 2

STAGE 2 - SOLVE THE WHITE CROSS

Stage 2


STAGE 3 - SOLVE THE WHITE CORNERS

Stage 3


STAGE 4 - SOLVE THE MIDDLE LAYER

Stage 4


STAGE 5 - SOLVE THE TOP FACE

Stage 5


Stage 5

STAGE 6 - SOLVE THE FINAL LAYER


How to Play Dota 2

Dota 2 doesn't seem to care whether you know how to play it or not..
There is a wall that many people see in front of Dota 2, and it can be hard to climb. Like many challenges, it's best to find some help to start.

PLAY THE TUTORIAL

You wouldn't play a sport with a bunch of strangers without knowing how it works. Dota 2does have a tutorial and, while it offers a small taste of the game's depth, it's better than nothing. You'll learn a few heroes (including Sniper, a popular, incredibly annoying pick), and you'll learn about the kinds of abilities characters have and how to activate them.
This is all very intro-level, but it's incredibly important, especially if you don't have much experience with Warcraft 3, which is the evolutionary basis for the modern MOBA genre. You'll also get a very basic introduction to items. Learn what Tangos are. You'll be using them often.

FIND A COACH

This might seem premature, but my first experiences with Dota 2 skipped past the "playing with bots" stage and went straight to "playing with friends who knew how to play Dota 2."
I'm impatient. I started playing Dota 2 specifically because it was the only thing anyone I knew was playing with any regularity, and I wanted to play games with my friends. It was only later that I started playing without them.
This is what allowed me to find fun right away, as opposed to struggling against bots in a game I didn't understand. I asked a ton of questions as we played and, because these were people who wanted me to understand the game, no question was seen as stupid.
There are a number of resources online, but constant supportive communication early on was key in getting me involved and keeping me from fleeing in terror at the prospect ofDota 2's complexity. So, if you've got friends on your Steam list who play Dota 2, ask if they'd be willing to show you the ropes.
Also, get a mic. Voice communication is critical, especially when you're learning. This should be seen as mandatory.

ON THE OTHER HAND, PLAY AGAINST BOTS

My sister started playing Dota 2 months before I did, primarily learning the game by using online resources and, unlike me, playing against bots. She played matches against the AI hundreds of times to learn the game and, as Dota 2's bot AI tends to be very aggressive, it's not a bad primer on player behavior in public, unranked games.
The result after hundreds of games is that my sister has a better win-loss record in matches than I do. That's not indicative of skill necessarily — and my team beat her team when we were randomly matched against her and her new Dota 2 friends, thank you very much — but she's put in a ton of practice and has used the in-game guides to learn heroes and the game very well.
I also play bot matches occasionally, for a very specific purpose: I can try new heroes, and pause the game to search online for strategies on how best to employ their abilities. It's a test environment where you can screw around without hurting your team or embarrassing yourself, and with a game like Dota 2, that's really important.
The best way to avoid criticism from the community is to not be new, and the best way to not be new is to play against the AI.

USE IN-GAME GUIDES

You'll see an open book icon in the upper-left corner of Dota 2's in-game UI. This is the guide menu, which contains player-written and rated guides for every hero in Dota 2. I like guides written by Purge personally, but explore different builds for heroes in bot matches to find the ones that seem most tailored to your abilities and sensibilities.
Guides aren't static resources to look at and close. As you earn levels, the guide you've selected will highlight the next recommended skill/skill level to pick, while giving the guide writer's explanation as to what each skill/spell is good for. Guides are just as useful for Dota 2's item shop — they create customized lists of recommended items to buy.
Remember that guides aren't a rulebook, and that you can and should deviate based on what your team needs from you. But they're an excellent starting point to learning characters and the game.

LISTEN TO PEOPLE WHO ARE BETTER THAN YOU AT DOTA 2

I'll add the caveat that you shouldn't put up with a ton of abuse from teammates, and I advise using the mute button in these cases; it's found by holding the "~" key in-game and clicking the speaker icon next to the offending player.
That said, the best way to learn how to play Dota 2 is to play with people who know more about it than you do. They can tell you where you should be, what hero best fits in the existing lineup, what items the team needs, etc. Also, people are more inclined to help you if you seem keen to help the team. Noobs aren't actually the worst teammates in Dota 2 — stubborn players who want to do their own thing are, and most people I've played with seem to know that. This segues nicely into my next suggestion, which is ...

PLAY SUPPORT HEROES

It's important to learn about hero roles in Dota 2 as quickly as possible, but as a beginner I gravitated towards support characters. Support heroes are self-explanatory - they act to help the more powerful damage-dealing characters survive and win the game.
They're also usually responsible for spending their gold on consumable items to help the team. If you want to get on your team's good side, offer to buy the courier before heroes are even picked. Tell them you're playing support. As you learn more heroes, let them know which supports you're capable with and ask how you can fit into the team lineup for the most success.
In my experience, this has had two effects. First, as I've gotten better about helping my team, rather than playing the character I arbitrarily want to play at any moment, I've had a better time. But also, I find that positive behavior in lobbies helps create a better environment in chat with random team members. Good vibes are often contagious. And when my team is working together, positively communicating with each other, I have more fun, even if we lose.
As you're learning the game, figure out what kinds of heroes you're best with. Maybe you won't need to roll support for long, and you'll be a better asset as a carry hero, focused on doing damage and winning team fights.

GO OUTSIDE THE GAME

You'll learn a lot about playing Dota 2 by playing Dota 2, but eventually you'll want to venture outside the game client into the greater community. Having more than eight million unique monthly players has the side effect of an enormous amount of community-generated content, and much of it is quite good. And if you're new, there's good news: you don't have to participate in it to benefit from it.
Outside of the community is the professional circuit, and this might be the most eye-opening experience you'll have with Dota 2. Professional competitions will show you ways to play heroes that you never imagined, and give primers on high level tactics and strategy on everything from map control to macro, which is the ways you handle your character moment to moment.
More importantly, it's fun to watch Dota 2 when you know what you're watching. It's exciting to see high-level play on a game that you understand, and in my experience, MOBAs are second only to fighting games in their readability. They move much more slowly than shooters and there's more action visible on screen at any given moment, making for something I've found much more entertaining to watch. The excitement is contagious.
Hell, the constant chatter this week about The International may be the whole reason you're reading this in the first place. Now it's time to take the next step and play the game.

Welcome to Cutway

Member Login

Lost your password?

Not a member yet? Sign Up!